Installation
Important
Currently, this installation method is for installing the plugin via the command line, rather than through napari’s Plugin Manager. Below is the step-by-step guide.
A. Pre-installation
1. Install Python
Before installing the plugin, please make sure you have Python >=3.9,<3.11
New to
Python? We recommend installingPython 3.10through the official Python website. This will include thepippackage manager, which is required to install the plugin.If you are unsure if you have
Pythoninstalled or which version you may have, you can check by running one of the following commands in your terminal or powershell:python --version
If the above does not work, try:
python3 --version
To specifically check for
Python 3.10python3.10 --version
Example output:
Python 3.10.11
2. Create a Virtual Environment
Next we will create a new Python environment to install the plugin. This will help avoid conflicts with other packages you may have installed by creating an isolated environment for the plugin to live in.
Tip
In general, it is good practice to choose a name for your environment that is related to either the project you are working on or the software you are installing. In this case, we use venv-allen-segmenter-ml where venv stands for “virtual environment”.
Navigate to where you want to create a new environment (e.g. Documents), run the following command in your terminal or powershell:
To create a new environment:
python3.10 -m venv venv-allen-segmenter-ml
To activate the environment:
source venv-allen-segmenter-ml/bin/activate
Confirm Virtual Environment is Activated
To confirm that the virtual environment has been successfully activated, you can follow these steps:
Check that the prompt includes the name of your virtual environment
venv-allen-segmenter-mlIn general it should look something like this:
(venv-allen-segmenter-ml) $
If on a Windows machine:
(venv-allen-segmenter-ml) PS C:\Users\Administrator\Documents>
Run the following command to verify
Python 3.10is being used within the virtual environment:python --version
B. Main installation
1. Install the plugin and napari
To install the latest version of the plugin together with napari in a single command:
pip install allencell-segmenter-ml
Note
Installing might take several minutes. Please wait until the CLI return to normal:
(venv-allen-segmenter-ml) PS C:\Users\Aministrator\Documents>
2. Install pyqt5
Lastly, we need to install pyqt5, a library to run the user interface (UI). Run the following command in your terminal or powershell:
pip install "napari[pyqt5]"
C. Post-Installation
Note
This section is specifically for users with at least one NVIDIA GPU installed on their machine.
- Not sure if you have an NVIDIA GPU?
You can check by running
nvidia-smi(see below for instruction)
If you do not have an NVIDIA GPU system, you can skip this section.
After installing the plugin, you need to install a PyTorch version that is compatible with your system. PyTorch is a deep learning library that is used to train and run the models in the plugin. However, we understand that everyone manages CUDA drivers and PyTorch versions differently depending on their system and use cases, and we want to respect those decisions because CUDA drivers can be a pain.
Required Package:
torch(PyTorch) 2.0 or later
1. Checking CUDA Version
To check your CUDA version, you can run the following command in your terminal or powershell:
nvidia-smi
As an example, the output will look similar to the table below:
In this case, my
CUDA Versionis11.8:
PS C:\Users\Administrator> nvidia-smi
Fri Sep 13 03:22:15 2024
+-----------------------------------------------------------------------------+
| NVIDIA-SMI 522.06       Driver Version: 522.06       CUDA Version: 11.8     |
|-------------------------------+----------------------+----------------------+
| GPU  Name            TCC/WDDM | Bus-Id        Disp.A | Volatile Uncorr. ECC |
| Fan  Temp  Perf  Pwr:Usage/Cap|         Memory-Usage | GPU-Util  Compute M. |
|                               |                      |               MIG M. |
|===============================+======================+======================|
|   0  Tesla T4           TCC   | 00000000:00:1E.0 Off |                    0 |
| N/A   27C    P8     9W /  70W |      0MiB / 15360MiB |      0%      Default |
|                               |                      |                  N/A |
+-------------------------------+----------------------+----------------------+

+-----------------------------------------------------------------------------+
| Processes:                                                                  |
|  GPU   GI   CI        PID   Type   Process name                  GPU Memory |
|        ID   ID                                                   Usage      |
|=============================================================================|
|  No running processes found                                                 |
+-----------------------------------------------------------------------------+
2. PyTorch installation
To Install PyTorch, please visit the PyTorch website and select the appropriate installation options for your system.
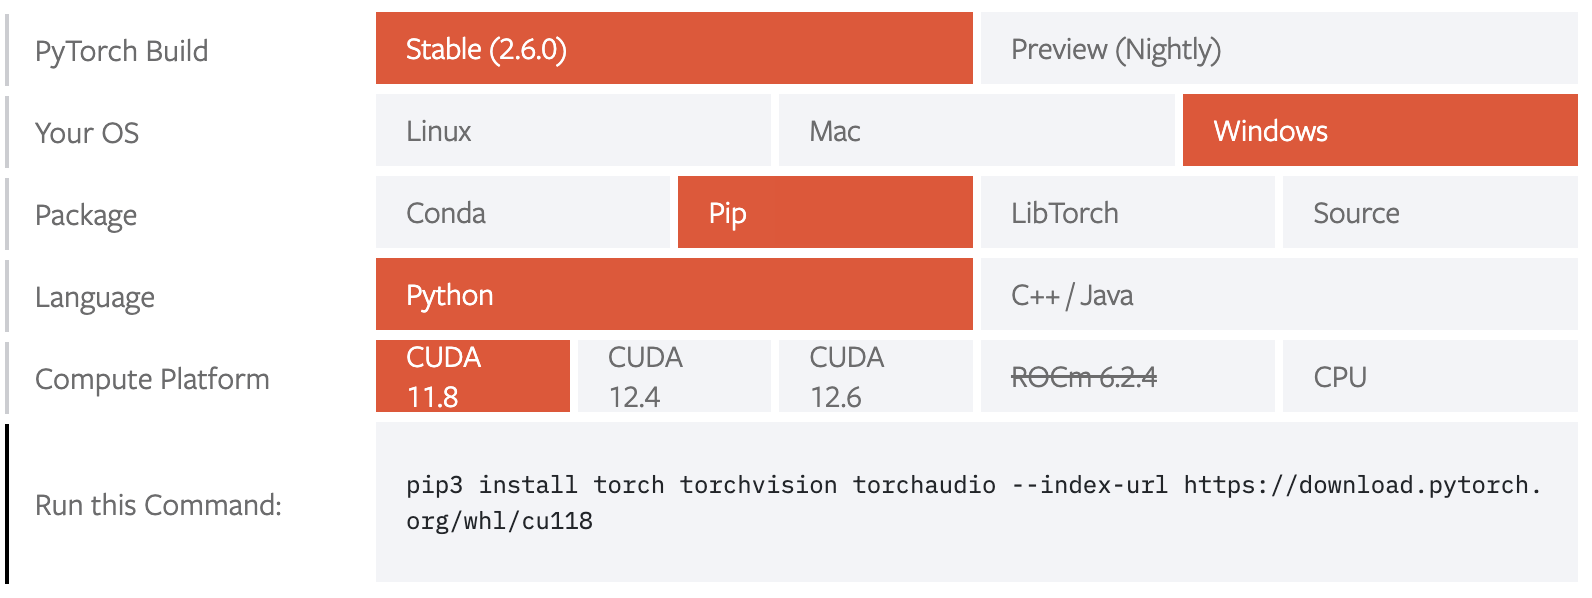
PyTorch Installation for Windows, MacOS, and Linux
For instance, if I am using:
Windows workstation
pip package manager
Python (3.10)
CUDA 11.8
Then the command for me according to the interactive guide from PyTorch would be:
pip3 install torch torchvision torchaudio --index-url https://download.pytorch.org/whl/cu118
If the installation is successful, let’s test just to be sure that your GPU is detected by PyTorch. Run the following command in your terminal or powershell:
python -c "import torch; print(torch.cuda.is_available())"
You should see True if your GPU is detected (see below). If you see False, then PyTorch is not detecting your GPU. You may need to reinstall PyTorch or check your CUDA drivers. Double check that your virtual environment is activated (venv-allen-segmenter-ml).
(venv-allen-segmenter-ml) PS C:\Users\Administrator\Documents> python -c "import torch; print(torch.cuda.is_available())"
If it returns
True, then you have successfully installed the plugin and PyTorch 🎉.
You are now ready to use the plugin!